- Mon Apr 28, 2008 11:01 pm
#47245
Nobody's really put together a decent explanation of this board yet, so here are my notes so far. I have an Olimex ARM-USB-OCD, the STM32-P103, and Ubuntu GNU/Linux 8.04 (32-bit x86) on my development system. This post specifically references Ubuntu, but hopefully this post will be helpful for people struggling with other configurations.
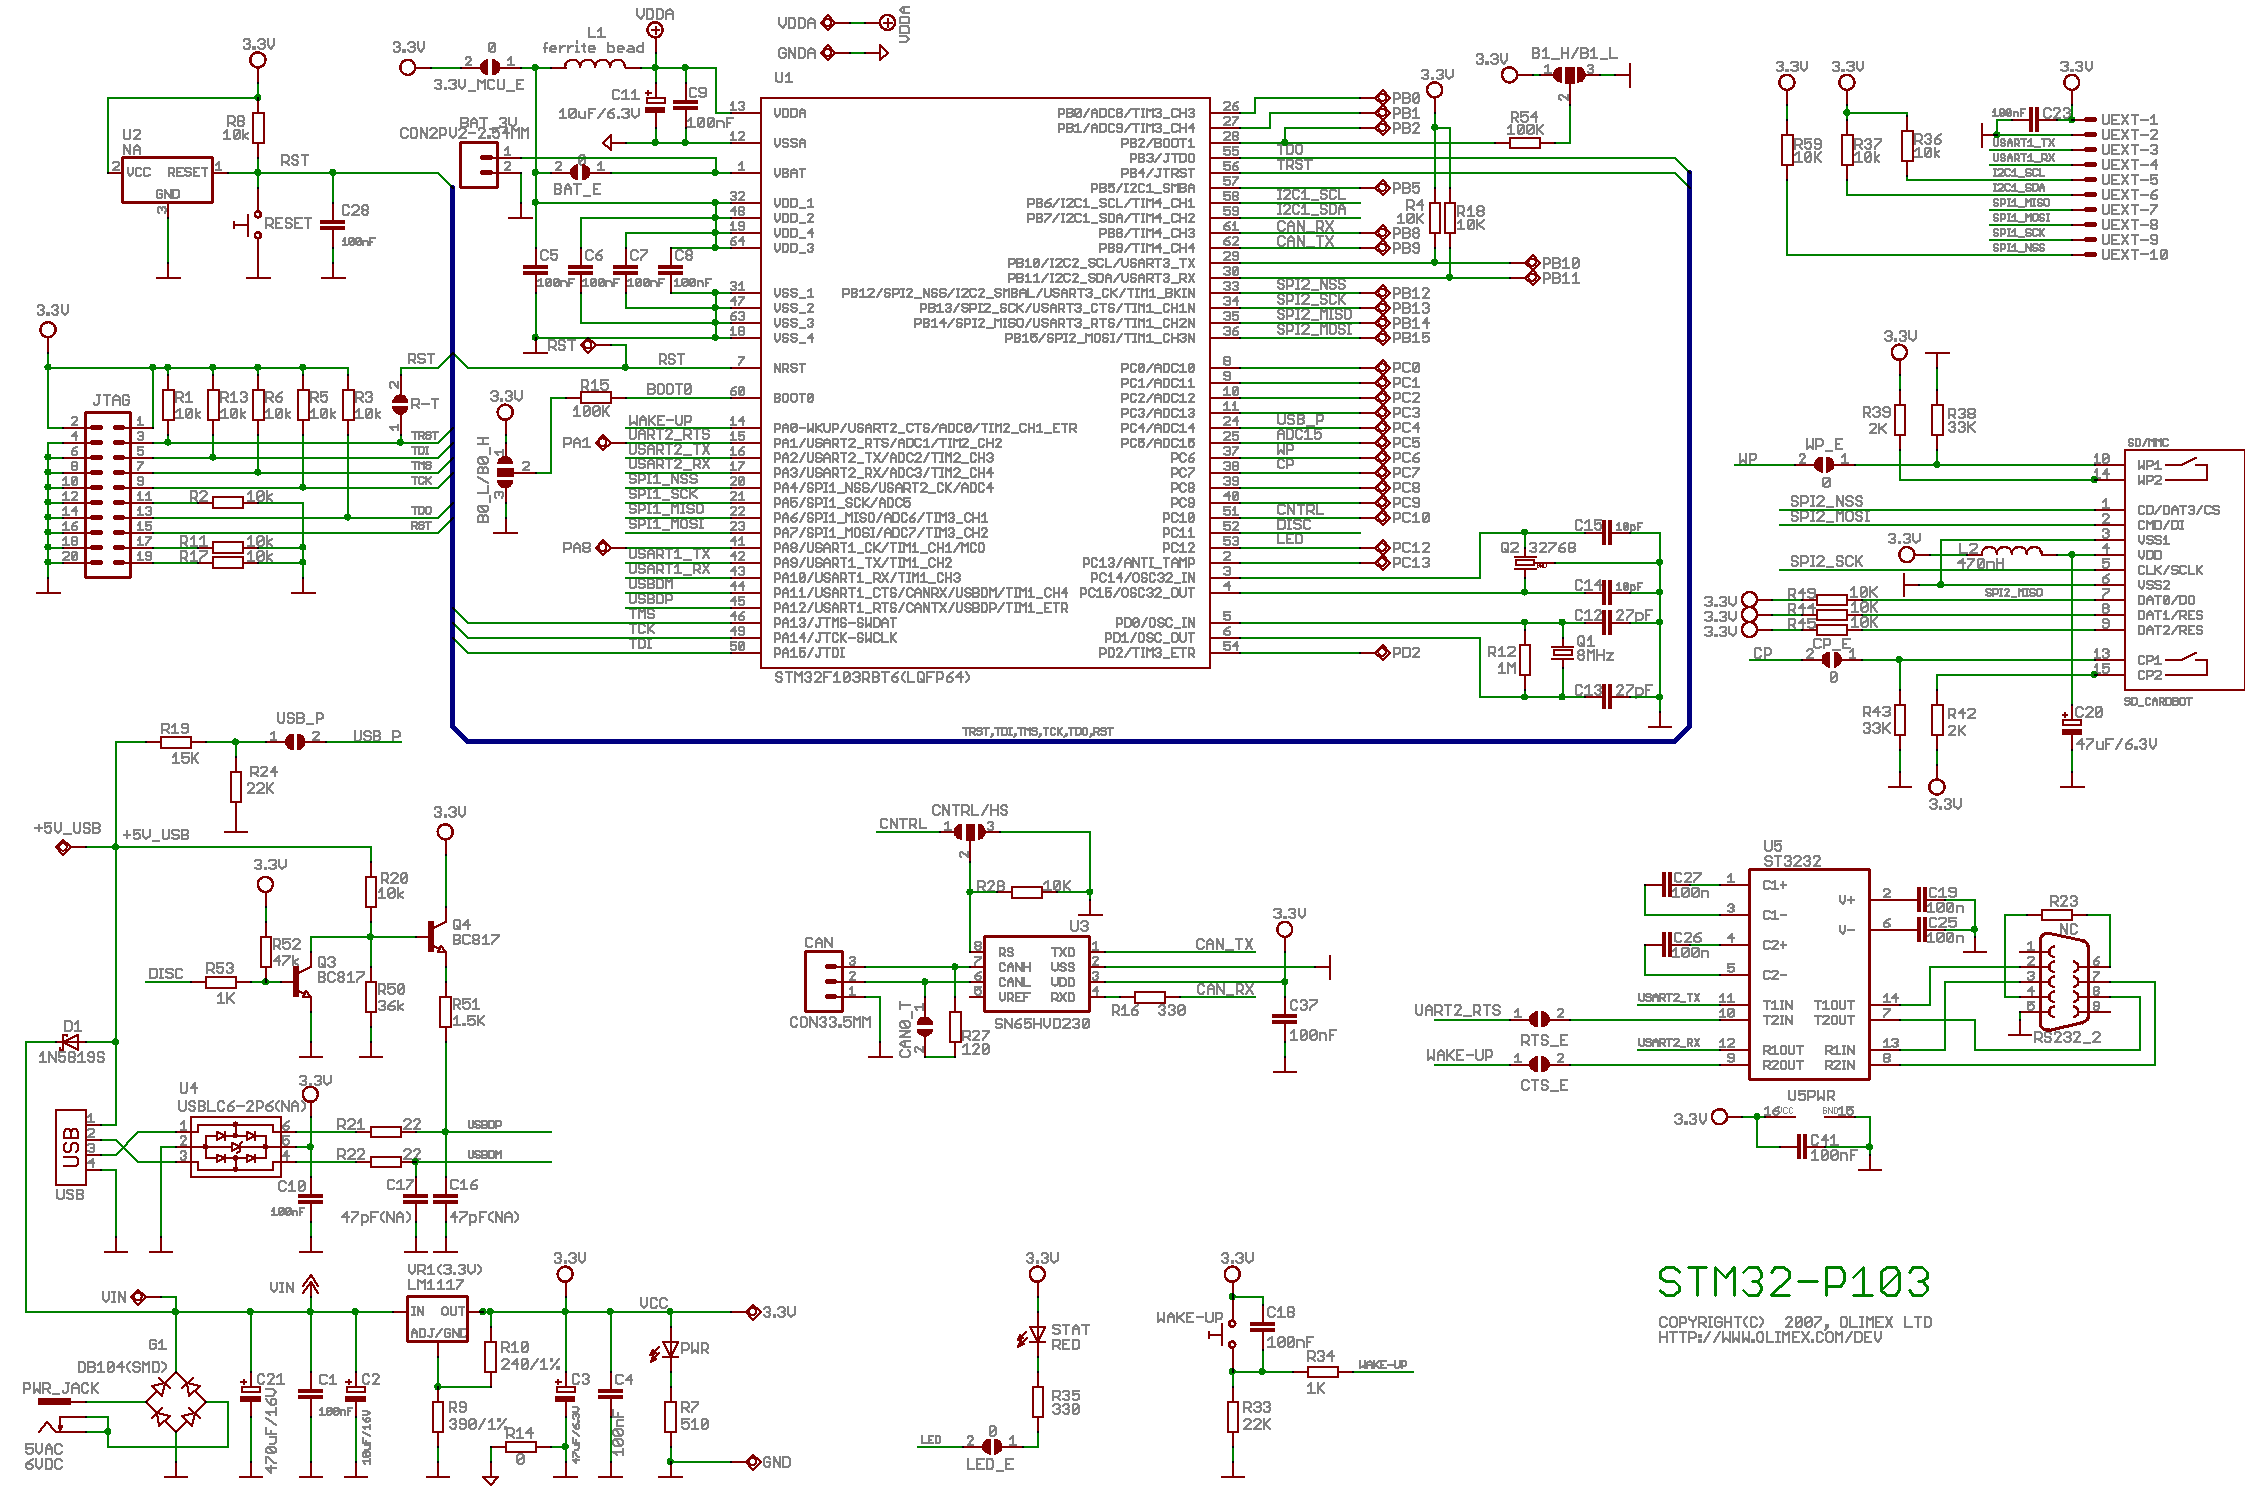
As far as documentation is concerned, ARM's Cortex-M3 Technical Reference Manual is the best source of general information. ST Microelectronic's STM32 documentation is another obvious primary source. Of particular interest is the STM32 datasheet. Last but not least, is Olimex's gif diagram of the P103. There really isn't much on this board other than the microcontroller.
Now, the memory map contained within the STM32 datasheet is particularly useful. The datasheet also describes the three boot modes: boot from Flash, boot from SRAM, or boot from System Memory, which is controlled by two pins on the chip. If you refer back to Olimex's diagram, you will learn that these control pins are padded out as B0_L/B0_H and B1_H/B1_L. Examining my board reveals that both are soldered low, which translates into booting from flash. This is fairly easy to change with a soldering iron that has good temperature control. SparkFun even has video tutorials.
This tells us where we need to load the startup program. First, however, we need to get a JTAG programmer working. So let's download and compile a fresh copy of OpenOCD.
OpenOCD depends upon a library to communicate with the FTD2232 chip on the debugger. I haven't had any luck with the binary drivers from FTDI Ltd., but the open source libftdi works fine for me. The latest version, as of April 28, 2008, is 0.12. It's a standard, and painless, gnu compile.
Finally, you may need to run ldconfig in order for programs to be able to find the shared library.
Now we are ready to tackle loading the sample program from Olimex.
Now, you might run into this problem:
Now, we are ready to start openocd:
I also hope your ordeal isn't as long and painful as mine. It took me two weeks of effort, averaging an hour a day to this project, to sort through all this. Some things in here I read off the internet, unfortunately I didn't track my sources. Thanks to everybody who unknowingly contributed to this post!
To reflash the chip, make sure the chip is halted, lock the chip, then unlock the chip. You will need to re-start openocd at certain points in this process. I haven't figured out the details yet. OpenOCD support for the STM32 has quite a ways to go before maturity.
As far as documentation is concerned, ARM's Cortex-M3 Technical Reference Manual is the best source of general information. ST Microelectronic's STM32 documentation is another obvious primary source. Of particular interest is the STM32 datasheet. Last but not least, is Olimex's gif diagram of the P103. There really isn't much on this board other than the microcontroller.
Now, the memory map contained within the STM32 datasheet is particularly useful. The datasheet also describes the three boot modes: boot from Flash, boot from SRAM, or boot from System Memory, which is controlled by two pins on the chip. If you refer back to Olimex's diagram, you will learn that these control pins are padded out as B0_L/B0_H and B1_H/B1_L. Examining my board reveals that both are soldered low, which translates into booting from flash. This is fairly easy to change with a soldering iron that has good temperature control. SparkFun even has video tutorials.
This tells us where we need to load the startup program. First, however, we need to get a JTAG programmer working. So let's download and compile a fresh copy of OpenOCD.
OpenOCD depends upon a library to communicate with the FTD2232 chip on the debugger. I haven't had any luck with the binary drivers from FTDI Ltd., but the open source libftdi works fine for me. The latest version, as of April 28, 2008, is 0.12. It's a standard, and painless, gnu compile.
Code: Select all
If you get a compile error, it's almost certainly because you are missing a library or it's header files. Just look at the error, and find an -l???, such as -lusb. Then find the Ubuntu packages named libusb-????? and libusb-dev, and be sure they are installed. ~/src/libfdti-0.12 $ ./configure && make
~/src/libfdti-0.12 $ sudo make installFinally, you may need to run ldconfig in order for programs to be able to find the shared library.
Code: Select all
OpenOCD is a little more involved, and requires a few more tools to build. For starters, you'll need an Subversion client, such as svn, to download a recent copy of the source code. As of now, the revision number is 624.~/src/libftdi-0.12 $ sudo ldconfigCode: Select all
If you omit which revision you want, you'll get the latest copy. You'll need GNU Autoconf and Automake for the next two steps.~/src $ svn checkout svn://svn.berlios.de/openocd/trunk -r 624Code: Select all
Be sure to pass these two parameters to ./configure:~/src $ sudo apt-get install autoconf
~/src $ sudo apt-get install automake
~/src $ cd openocd
~/src/openocd $ ./bootstrap
Code: Select all
Then run "make" and optionally "make install". Note that you can control where things are installed by passing the --prefix=/installation/path option to configure. It defaults to /usr/local/, and is set up in the example to use your Home directory.~/src/openocd $ ./configure --prefix=${HOME} --enable-ft2232_libftdi --enable-usbprog
Code: Select all
For convenience, be sure that /installation/path/bin/ is in your search path. Alternatively, I prefer to install things in their own directories, and put symbolic links in ~/bin.~/src/openocd $ make && make install
Now we are ready to tackle loading the sample program from Olimex.
Code: Select all
This is normal: Even though the configuration advertises itself as being for the ARM-USB-OCD, in fact, the cfg file provided doesn't work. Try this instead:~/src/projects/stm_p103_blink_flash $ openocd -f lpc2xxx_armusbocd.cfg
Open On-Chip Debugger 1.0 (2008-04-27-17:45) svn:623
$URL: svn://svn.berlios.de/openocd/trunk/src/openocd.c $
Info: options.c:50 configuration_output_handler(): jtag_speed: 10, 10
Info: options.c:50 configuration_output_handler(): Open On-Chip Debugger 1.0 (2008-04-27-17:45) svn:623
Error: ft2232.c:1467 ft2232_init_libftdi(): unable to open ftdi device: device not found
Code: Select all
Here, the key is the Vendor ID (0x15ba) and Product ID (0x0003) of the Olimex ARM-USB-OCD. The numbers for other FTD2232-based devices can be found at /sys/bus/usb/devices/?-?/idVendor, where each question mark is a numerical id used by the USB host driver. interface ft2232
ft2232_device_desc "Olimex OpenOCD JTAG"
ft2232_layout olimex-jtag
ft2232_vid_pid 0x15ba 0x0003
jtag_speed 10
jtag_nsrst_delay 200
jtag_ntrst_delay 200
reset_config trst_and_srst
jtag_device 4 0x1 0xf 0xe
jtag_device 5 0x1 0x1 0x1e
daemon_startup reset
target cortex_m3 little reset_halt 0
run_and_halt_time 0 30
working_area 0 0x20000000 0x4000 nobackup
flash bank stm32x 0x08000000 0x00010000 0 0 0
Now, you might run into this problem:
Code: Select all
This is due to permission problems for the device. I highly recommend creating the file /etc/udev/rules.d/45-ft2232.rules with the following contents:~/src/projects/stm_p103_blink_flash $ openocd -f stm32.cfg
Open On-Chip Debugger 1.0 (2008-04-27-17:45) svn:623
$URL: svn://svn.berlios.de/openocd/trunk/src/openocd.c $
Info: options.c:50 configuration_output_handler(): jtag_speed: 40, 40
Info: options.c:50 configuration_output_handler(): Open On-Chip Debugger 1.0 (2008-04-27-17:45) svn:623
Error: ft2232.c:1467 ft2232_init_libftdi(): unable to open ftdi device: unable to fetch product description
Code: Select all
This will adjust the permissions for the Olimex ARM-USB-OCD automatically whenever the device is plugged in, allowing anybody in the group "plugdev" to read and write to the device. Plugdev happens to be the natural choice for Ubuntu, YMMV. Of course, you'll need to change the vendor and product ids for other debuggers.BUS!="usb", ACTION!="add", SUBSYSTEM!=="usb_device", GOTO="kcontrol_rules_end"
SYSFS{idProduct}=="0003", SYSFS{idVendor}=="15ba", MODE="664", GROUP="plugdev"
LABEL="kcontrol_rules_end"
Now, we are ready to start openocd:
Code: Select all
Now, this means that openocd has successfully established communications with the debugger, and verified that there is a board hooked up to it. However, OpenOCD's support for the STM32 is currently immature, so actually getting the sample program flashed currently involves a certain amount of hopping around on one foot while shaking a stick at the software. So let's give it a shot:~/src/projects/stm_p103_blink_flash $ openocd -f stm32.cfg
Open On-Chip Debugger 1.0 (2008-04-27-17:45) svn:623
$URL: svn://svn.berlios.de/openocd/trunk/src/openocd.c $
Info: options.c:50 configuration_output_handler(): jtag_speed: 40, 40
Info: options.c:50 configuration_output_handler(): Open On-Chip Debugger 1.0 (2008-04-27-17:45) svn:623
Info: jtag.c:1376 jtag_examine_chain(): JTAG device found: 0x3ba00477 (Manufacturer: 0x23b, Part: 0xba00, Version: 0x3)
Info: jtag.c:1376 jtag_examine_chain(): JTAG device found: 0x16410041 (Manufacturer: 0x020, Part: 0x6410, Version: 0x1)
Info: jtag.c:1376 jtag_examine_chain(): JTAG device found: 0x3ba00477 (Manufacturer: 0x23b, Part: 0xba00, Version: 0x3)
Info: jtag.c:1376 jtag_examine_chain(): JTAG device found: 0x16410041 (Manufacturer: 0x020, Part: 0x6410, Version: 0x1)
User: target.c:418 target_process_reset(): Timed out waiting for halt after reset
Code: Select all
The answer to this problem is that we need to run stm32x unlock 0~ $ telnet localhost 4444
Trying 127.0.0.1...
Connected to localhost.
Escape character is '^]'.
Open On-Chip Debugger
> flash probe 0
device id = 0x20016410
SWJ-DP STICKY ERROR
dcb_dhcsr 0x30003, nvic_shcsr 0x20000, nvic_cfsr 0x1001, nvic_bfar 0xe000edf8
flash size = 0kbytes
flash 'stm32x' found at 0x08000000
Code: Select all
The unlock command didn't appear to work, but it did. However, you cannot write to flash memory at this point either. You must restart the OpenOCD server before you'll be able to write to flash:> stm32x unlock 0
Device Security Bit Set
stm32x unlocked
> flash probe 0
device id = 0x20016410
SWJ-DP STICKY ERROR
dcb_dhcsr 0x30003, nvic_shcsr 0x20000, nvic_cfsr 0x1001, nvic_bfar 0xe000edf8
flash size = 0kbytes
flash 'stm32x' found at 0x08000000
Code: Select all
Now, that looks kind of scary, and I thought this might be referring to the Memory Protection Unit (MPU) included on the STM32 family. However, this doesn't appear to mean anything at the moment, just go ahead and write the flash. Besides, the "flash protect" command is completely broken on STM32. ~ $ telnet localhost 4444
Trying 127.0.0.1...
Connected to localhost.
Escape character is '^]'.
Open On-Chip Debugger
> flash probe 0
device id = 0x20016410
flash size = 128kbytes
flash 'stm32x' found at 0x08000000
> flash info 0
#0: stm32x at 0x08000000, size 0x00020000, buswidth 0, chipwidth 0
#0: 0x00000000 (0x400 1kB) protected
#1: 0x00000400 (0x400 1kB) protected
#2: 0x00000800 (0x400 1kB) protected
[snipped for brevity...]
#127: 0x0001fc00 (0x400 1kB) protected
stm32x flash driver info
Code: Select all
Now, I have a blinking LED after this ordeal, and I hope you do too! > flash write_bank 0 main.bin 0
> reset init
I also hope your ordeal isn't as long and painful as mine. It took me two weeks of effort, averaging an hour a day to this project, to sort through all this. Some things in here I read off the internet, unfortunately I didn't track my sources. Thanks to everybody who unknowingly contributed to this post!
To reflash the chip, make sure the chip is halted, lock the chip, then unlock the chip. You will need to re-start openocd at certain points in this process. I haven't figured out the details yet. OpenOCD support for the STM32 has quite a ways to go before maturity.