- Sun Oct 28, 2012 2:03 pm
#151139
The album with my process
Hook up everything according to the pictures above, for exact pin to pin use the info/diagrams below.
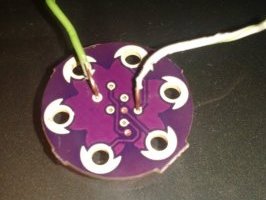
The holes on the back of the LilyT* are too small for the jumper wires, had to find some thin wire. Used some five strand copper wire, bent it apart, and then took... A long time getting them to stay connected. There's no room because the Attiny85 sits almost flush against the board.
Steps:
I believe you can ignore it.
Source for attaching Attinyxx to Arduino
Fritzing diagram and other info
Hook up everything according to the pictures above, for exact pin to pin use the info/diagrams below.
The holes on the back of the LilyT* are too small for the jumper wires, had to find some thin wire. Used some five strand copper wire, bent it apart, and then took... A long time getting them to stay connected. There's no room because the Attiny85 sits almost flush against the board.
Steps:
- 1. Remove the 10uF capacitor, we need to upload Files->Examples->ArduinoISP to the Arduino first.
2. Select Tools->Board->Attiny85 (internal xMHz clock), where x is whatever you want (I believe it is defaulted to "1", and in order to use higher you have to Burn Bootloader, more info in the sources below)
3. Tools->Programmer->Arduino as ISP
4. Upload your sketch like you normally would.
I believe you can ignore it.
Source for attaching Attinyxx to Arduino
Fritzing diagram and other info