- Sat Apr 16, 2011 2:51 pm
#125569
**SOLVED** (skip down to the solution toward the bottom if you are in a hurry)
I originally asked for help in this post:viewtopic.php?f=32&t=27105 but thought I should post my own solution since I was having a slightly different problem and what worked for those individuals did not work for me.
Symptoms:
When trying to upload a sketch, any sketch, to an Arduino Pro Mini 3.3v using an FTDI Breakout Board 3.3v I received the following errors from the IDE:
avrdude: stk500_getsync(): not in sync: resp 0x00
avrdude: stk500_disable(): protocol error, expect 0x14, resp 0x51
When connected to the FTDI board which was in turn connected to the computer via USB I would get eight blinks from the LED by pin 10 and the red LED would remain illuminated. I clicked upload on the IDE the Arduino Pro Mini would reset, LED by pin 10 would blink a couple times, then TX red LED on FTDI board would flash three times. The result would always be these errors.
Let me first describe what I was using and what I tried:
Hardware and Software:
I quickly started to believe the problem was with my FTDI board, PC, or settings so I used the tests below to elliminate those variables.
FTDI loopback test:
So I happen to have an Arduino Uno handy and this really saved my behind. Since I never had any issues uploading sketches to the Uno at any point during this headache Sparkfun tech support suggested I attempt to upload a sketch to the Uno using my FTDI board. I was hesitant at first thinking the Uno required 5v and the FTDI board that I had only supplied 3.3v. To my surprise, it worked!
Both of the above tests proved my FTDI hardware, drivers, and settings were correct. That pretty much left me with the possibility of two faulty Arduino Pro Minis. Since the LED activity on the Arduino Pro Minis appeared to indicate the hardware was functioning correctly I turned toward troubleshooting the bootloader.
**SOLUTION** Reinstall the Arduino Pro Mini Bootloader using my Arduino Uno as an ISP Programmer!
To resolve the errors I burned the bootloader to the Arduino Pro Minis using my functioning Arduino Uno as an ISP. For the most part I followed the instructions here: http://www.sparkfun.com/tutorials/247 adhering to Option 1 but using the Arduino IDE to burn the bootloader. Here is what I did step by step:
1. Connect the Arduino Uno via USB to the PC
2. Open the Arduino IDE
3. Select the correct COM port and board (Arduino Uno)
4. Open the ArduinoISP sketch (File>Examples>ArduinoISP)
5. Upload the sketch. once complete your Arduino Uno is now programmed to be an ISP programmer. This is great because I really didn't want to buy a seperate programmer.
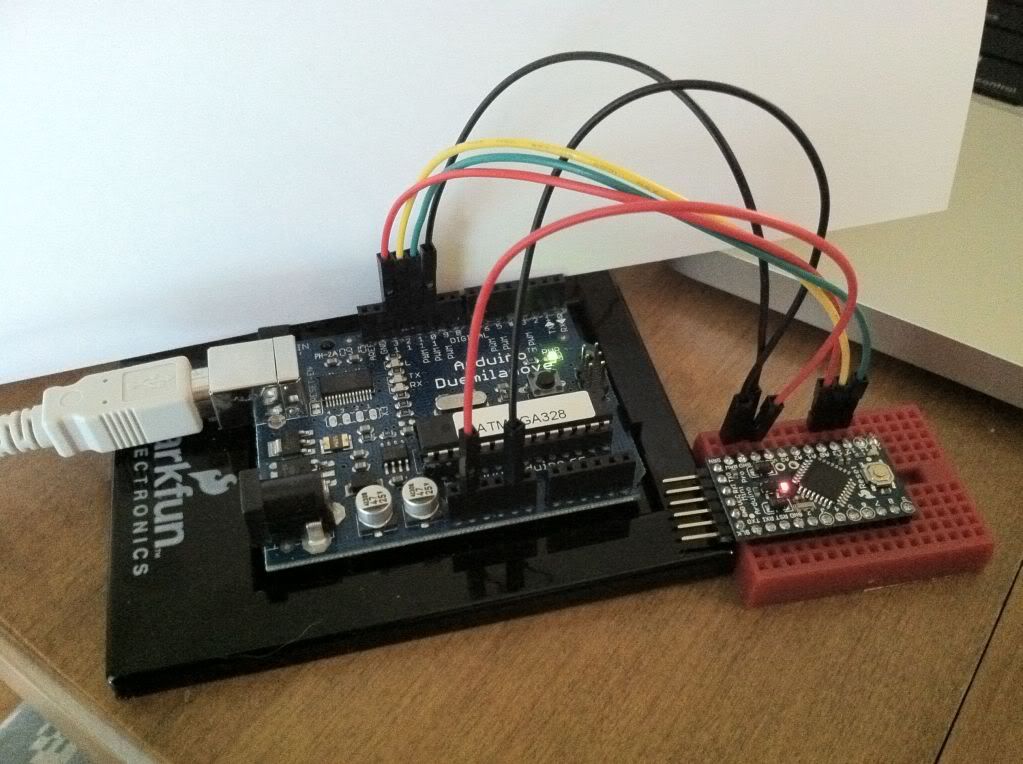
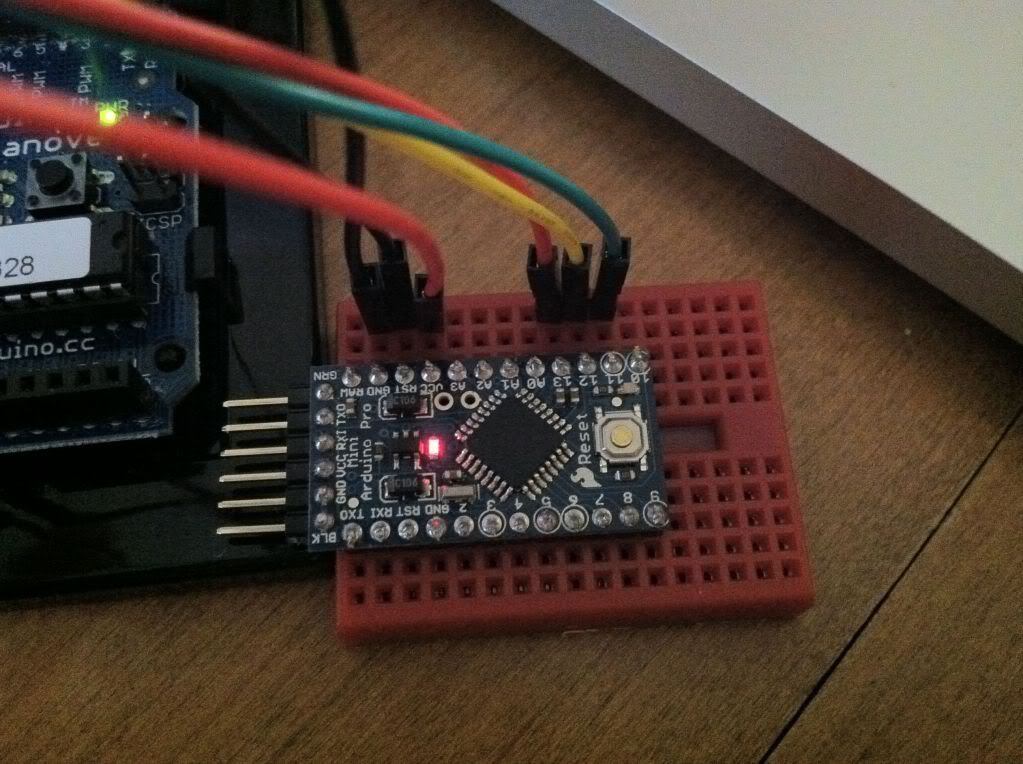
6. Power the Uno off and wire the Uno to the Arduino Pro Mini in the following fashion:
Uno---------------Pro Mini
3.3v-----------------------VCC
GND------------------------GND
Digital Pin 11(MOSI)----pin 11 (MOSI)
Digital Pin 12(MISO)----pin 12 (MISO)
Digital Pin 13(SCK)-----pin 13 (SCK)
Digital Pin 10----------RST
7. Power on the Uno
8. Select the correct COM port
9. IMPORTANT: Select board Arduino Pro Mini 3.3v w/ATmega328 as the board we are uploading to
10.from the Tools menu, select Burn Bootloader > w/Aduino as ISP
This was a magical moment for me. All kinds of LEDS were blinking and flashing. After a few seconds the IDE said: Done burning bootloader, thank you. If this is also your result you have successfully reinstalled the bootloader on you Arduino Pro Mini. Next, connect the FTDI board to the Arduino Pro Mini and attempt to upload a sketch. I was so excited that this worked I let my wife sucker me into going to the arts and crafts store so she could buy some new sewing thread. Don't fall for this. Every sketch I have uploaded to my Arduino Pro Minis has been successful form this point on. The end.
I originally asked for help in this post:viewtopic.php?f=32&t=27105 but thought I should post my own solution since I was having a slightly different problem and what worked for those individuals did not work for me.
Symptoms:
When trying to upload a sketch, any sketch, to an Arduino Pro Mini 3.3v using an FTDI Breakout Board 3.3v I received the following errors from the IDE:
avrdude: stk500_getsync(): not in sync: resp 0x00
avrdude: stk500_disable(): protocol error, expect 0x14, resp 0x51
When connected to the FTDI board which was in turn connected to the computer via USB I would get eight blinks from the LED by pin 10 and the red LED would remain illuminated. I clicked upload on the IDE the Arduino Pro Mini would reset, LED by pin 10 would blink a couple times, then TX red LED on FTDI board would flash three times. The result would always be these errors.
Let me first describe what I was using and what I tried:
Hardware and Software:
- Arduino Pro Mini 3.3v w/ATmega328 (I actually have two of these and BOTH were failing)
- FTDI Breakout Board 3.3v
- Arduino Uno (not part of the original problem but used in the solution. I never had any issues uploading sketches to the Uno at any time)
- Appropriate USB cables
- Arduino IDE v0022
- FTDI VCP Drivers v2.08.14
- Windows 7 64-bit
- checking and rechecking, soldering and resoldering headers on the Arduino Pro Mini to ensure there isn't a faulty connection (according to most other posts this resolved most instances of these errors)
- buying new USB cables
- replacing the FTDI board (Since i never had issues uploading sketches to my Uno and both
- considering replacing the Arduino Pro Mini
- wired the FTDI to the Arduino without using the programming headers
- checked, rechecked, and triple checked port and board setting in the Aduino IDE
- tried different reset timing and sequences
- uninistalled and reinstalled all drivers and IDE
- changed port settings, numbers, baud rate, etc
- turned off my firewall
I quickly started to believe the problem was with my FTDI board, PC, or settings so I used the tests below to elliminate those variables.
FTDI loopback test:
- You can verify proper operation of the FTDI board by putting a jumper on the TX and RX pins
- then connecting the FTDI via USB to you computer.
- Then run the Arduino IDE and open the Serial Monitor.
- Enter a character in the input textbox and click "send". If the FTDI board is working and drivers and settings are correct you should see your input echoed in the textbox below.
So I happen to have an Arduino Uno handy and this really saved my behind. Since I never had any issues uploading sketches to the Uno at any point during this headache Sparkfun tech support suggested I attempt to upload a sketch to the Uno using my FTDI board. I was hesitant at first thinking the Uno required 5v and the FTDI board that I had only supplied 3.3v. To my surprise, it worked!
- You only really need to connect the RX, TX, VCC, and GND for the communication to work and this is how I did it:
FTDI ----Arduino Uno
RX-------TX (pin 1)
TX-------RX (pin 0)
3v3------3.3V
GND-----GND - connect the FTDI via USB to my computer
- open the Arduino IDE and selected the correct COM port and Board (Uno in this case).
- This next step is important because I did not connect the RESET between the FTDI and Uno. When I clicked on upload i watched the FTDI board intently, when the TX LED (the red one and may be rather dim) flashed the first time I pressed the RESET button on the Uno.
- If all goes well you should successfully upload the sketch to the Uno.
Both of the above tests proved my FTDI hardware, drivers, and settings were correct. That pretty much left me with the possibility of two faulty Arduino Pro Minis. Since the LED activity on the Arduino Pro Minis appeared to indicate the hardware was functioning correctly I turned toward troubleshooting the bootloader.
**SOLUTION** Reinstall the Arduino Pro Mini Bootloader using my Arduino Uno as an ISP Programmer!
To resolve the errors I burned the bootloader to the Arduino Pro Minis using my functioning Arduino Uno as an ISP. For the most part I followed the instructions here: http://www.sparkfun.com/tutorials/247 adhering to Option 1 but using the Arduino IDE to burn the bootloader. Here is what I did step by step:
1. Connect the Arduino Uno via USB to the PC
2. Open the Arduino IDE
3. Select the correct COM port and board (Arduino Uno)
4. Open the ArduinoISP sketch (File>Examples>ArduinoISP)
5. Upload the sketch. once complete your Arduino Uno is now programmed to be an ISP programmer. This is great because I really didn't want to buy a seperate programmer.
6. Power the Uno off and wire the Uno to the Arduino Pro Mini in the following fashion:
Uno---------------Pro Mini
3.3v-----------------------VCC
GND------------------------GND
Digital Pin 11(MOSI)----pin 11 (MOSI)
Digital Pin 12(MISO)----pin 12 (MISO)
Digital Pin 13(SCK)-----pin 13 (SCK)
Digital Pin 10----------RST
7. Power on the Uno
8. Select the correct COM port
9. IMPORTANT: Select board Arduino Pro Mini 3.3v w/ATmega328 as the board we are uploading to
10.from the Tools menu, select Burn Bootloader > w/Aduino as ISP
This was a magical moment for me. All kinds of LEDS were blinking and flashing. After a few seconds the IDE said: Done burning bootloader, thank you. If this is also your result you have successfully reinstalled the bootloader on you Arduino Pro Mini. Next, connect the FTDI board to the Arduino Pro Mini and attempt to upload a sketch. I was so excited that this worked I let my wife sucker me into going to the arts and crafts store so she could buy some new sewing thread. Don't fall for this. Every sketch I have uploaded to my Arduino Pro Minis has been successful form this point on. The end.